SDC#5 - Making Your Database Highly Available
A look at Notion's Flexible Data Model and more...
Hello, this is Saurabh…👋
Welcome to the 11 new subscribers who have joined us since the last edition.
If you aren’t subscribed yet, join 600+ curious developers looking to expand their knowledge by subscribing to this newsletter.
In this issue, I cover the following topics:
🖥 System Design Concept → Making Your Database Highly Available
🧰 Case Study → The Flexibility of Notion’s Data Model
🍔 Food For Thought → Software Engineer is NOT just coding
So, let’s dive in.
🖥 Making your Database Highly-Available
If you are a doctor treating a patient and want to access her medical record, you’d want the details to be available at all times.
In case of an emergency situation, there can be absolutely no slippage. The data should be highly available.
This is easier said than done.
You can make the application highly-available with multiple instances. But if your database still resides on a single node, you are in a vulnerable situation.
To make it work, your database should also be highly-available.
There are two main factors that control the high availability of a database.
Redundancy
Isolation
Redundancy is managed by duplicating the database components.
Isolation is achieved by placing the redundant components in independent hosts in preferably different geographic locations.
Let’s look at both of these approaches in more detail:
Redundancy
Redundancy is all about having options.
If you’ve one database server and it goes down, that’s the end of the show.
Goodbye, go home! Game over!
Clearly, no business looking to thrive would want a database going down. A study claims that the cost of a database outage is an average of $7900 per minute.
Many businesses wouldn’t be able to survive such a monetary shock.
Therefore aiming for redundancy is a natural choice.
But don’t mistake redundancy for backups.
Backups are more about keeping a copy of the data safe in case of catastrophic loss.
If you have only one database server with a backup strategy in place, it’s still going to cost your business big time to make the backup data available to the actual users and for normal operations to resume.
Plus, there are chances that the backup copy is way behind the actual data so you might have to deal with loss of data.
What businesses actually want is multiple database instances working closely together such that the user still thinks it’s just one database instance.
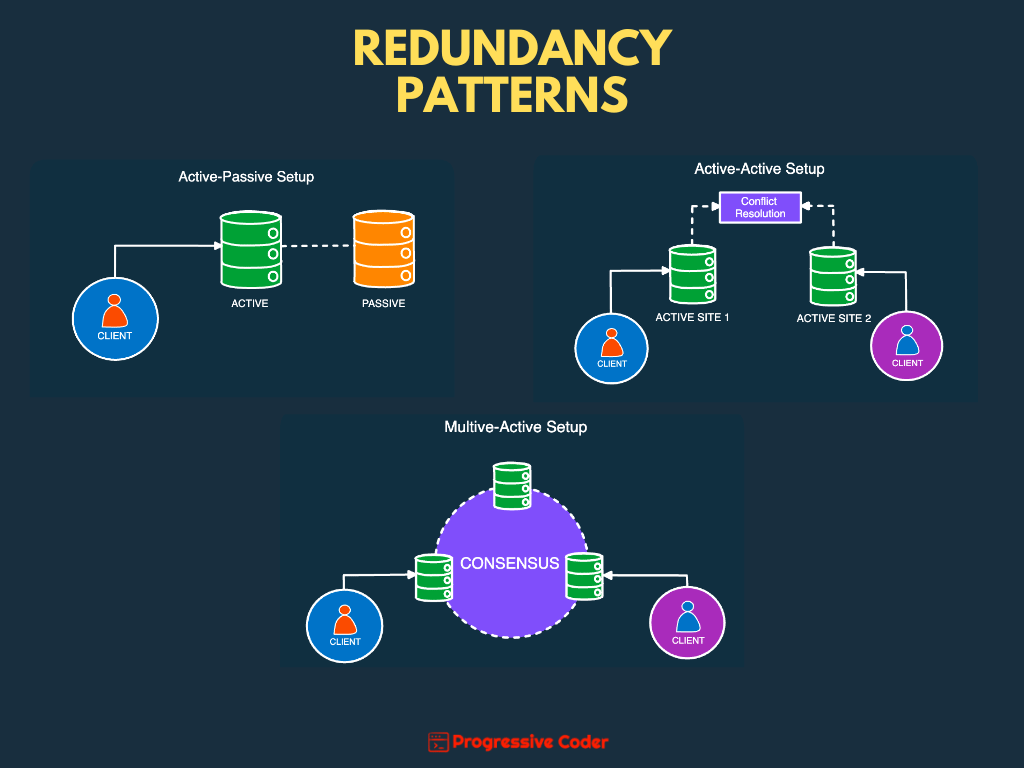
There are 3 main patterns that help achieve this level of redundancy:
Active Passive
Active Active
Multi Active
Here’s a quick illustration that shows each pattern.
Isolation
Isolation is all about reducing the impact radius of a disaster on your database system.
The more physically separated your redundant components are, the less likely that all of them will fail at the same time.
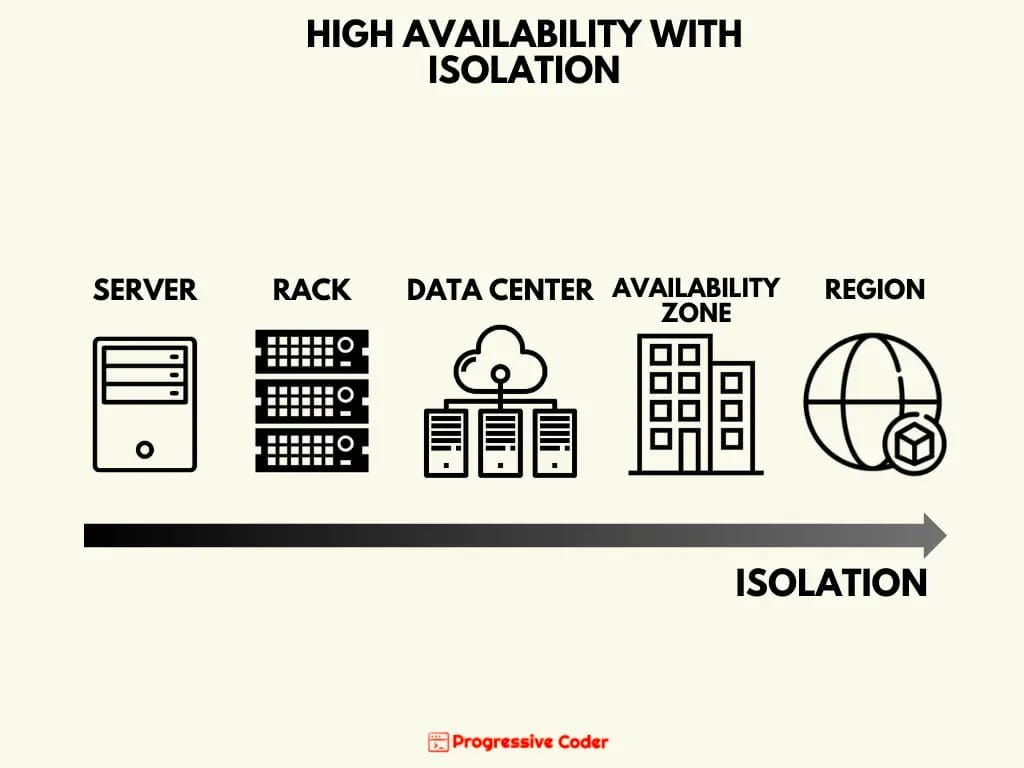
Here are the various degrees of separation you can opt for:
Server
Rack
Data-center
Availability Zone
Region
As you move right on the below isolation scale, you get greater physical separation and potentially higher availability in case of unforeseen circumstances.
🧰 Notion’s Data Model
Software engineers have this innate desire to build flexible systems.
Systems that can do a lot more than originally intended.
Systems that can extend with any requirement you throw at them.
Usually, this thought process leads to products that try to do much at the same time and usually end up failing.
However, Notion is one of the few products that has bucked the trend.
Over the years, it has managed to support many different requirements and applications. The community around Notion has exploded and many secondary products have been built using the core platform.
A large part of this success goes to the incredibly flexible data model built by Notion’s team.
But what’s the secret to this flexibility?
It’s the concept of Blocks.
Blocks in Notion are a unit of information. There are multiple types of Blocks:
Text
Image
List
Row
Page
Think of Blocks in Notion as Lego blocks in a set.
You combine smaller Blocks to make a bigger Block - a classic demonstration of composition.
Despite their multiple uses, each Block has some key attributes:
ID - Unique and randomly generated UUID V4
Properties - Custom and user-defined fields
Type - The kind of Block (text, list, image)
These attributes basically control how a Block is displayed within the Notion editor.
However, that’s not all.
Each Block also has other attributes meant for linking it to other Blocks in the system. For example:
Content - Array of block IDs for nesting content within a block such as items in a list.
Parent - The ID of the Block’s parent.
Here’s what a sample Block looks like:
But the magic doesn’t end there.
If you’ve used Notion in a collaborative mode, you must have noticed that it provides a concurrent interface.
It means you and your friend can update a page together in real time.
This behavior is managed by the Block’s lifecycle which consists of 3 stages:
Creating a new Block
Saving the Block on the server
Rendering the Block on the friend’s screen.
Let’s look at each step:
STEP 1 - Creating a New Block
When you create a Block on your Notion page, the client application fills in the initial attributes such as:
Unique ID
Block Type
Properties
The parent Block is also updated to keep track of the position of the new block in the overall hierarchy.
At this point, two things happen:
Data is saved in the local state (in-memory) and the editor is re-rendered to show the new Block.
Also, the client saves the data to the TransactionQueue.
The TransactionQueue is responsible for sending all transactions to Notion’s servers. Until that happens, the transactions are stored safely in IndexedDB or SQLite.
Here’s what it looks like:
STEP 2 - Saving the Block
In the next step, data is serialized and posted to the API endpoint.
Here are the steps that take place:
Load all blocks and their parents that are part of the transaction.
Duplicate the “before” data.
Apply changes to the duplicated data to create the “after” data.
Validate and save.
The “success” response is returned to the client so that it can continue with the next transaction.
Here’s what it looks like:
STEP 3 - Rendering the Block on the Friend’s Screen
Until this point, the new Block is available on your screen as you make updates to a page.
However, in a collaborative setup, this update should make its way to your friend’s screen as well.
After saving the Block to the database in Step 2, the API also notifies the MessageStore service.
The MessageStore service is responsible for Notion’s real-time updates.
Every client has a WebSocket connection to the MessageStore and it subscribes to any record changes.
Here’s what happens behind the scenes:
The API notifies the MessageStore service of the new versions for the updated blocks.
MessageStore finds all the client connections that are subscribed to those changes and passes the notifications to the client via the WebSocket connection.
The client receives the version update notification and verifies it with the version of the block in its local cache.
On encountering the difference, it makes a call to the API for the latest record data, updates its local copy and re-renders the view.
The below illustration depicts the flow at a high level:
As you may have noticed by now, Blocks are the foundation of Notion’s tremendous flexibility.
It allows the users to tailor the software for their own purposes without additional burden on the Notion engineers to support varied requirements.
They can focus on building the core product and focus on providing additional tools to the users.
In my view, this is a great approach to follow if you also want to build software that’s highly flexible.
Don’t try to build software solutions that solve every problem.
Instead, think of how you can empower your users to solve their own problems with your software.
P.S. This post is inspired by the explanation of Notion’s Data Model on their engineering blog. You can find the original article over here.
🍔 Food For Thought
👉 I’ve always believed that software engineering is NOT just a matter of coding.
There’s so much a software engineer is expected to do in order to ship high-quality working code that solves a business problem.
The below post sums up this idea beautifully.
Here’s the link:
https://x.com/Franc0Fernand0/status/1697481663318577275?s=20
👉 Are you looking to get promoted?
Well, who isn’t?
But we often commit a fatal flaw while putting in the efforts for promotion.
We tend to ignore the manager or worse, we work against them.
I feel that teaming up with the manager’s mission is a far better approach to getting the coveted promotion and making allies along the way.
Here’s the link to the tweet:
https://x.com/ProgressiveCod2/status/1697859692117012515?s=20
That’s it for today! ☀️
Enjoyed this issue of the newsletter?
See you later with another value-packed edition — Saurabh.


