


A Simple Git Workflow
All developers should know this...

If you’re a developer, learning Git is like learning how to breathe in the world of software development—it’s essential.
Whether you’re working solo on a passion project or collaborating with a team spread across the globe, Git keeps track of your code changes, helps you collaborate without stepping on each other’s toes, and gives you the power to go back in time if something breaks.
That said, Git can seem intimidating when you first encounter its many commands and concepts. But the truth is, you can get pretty far with a simple, basic workflow that covers 90% of day-to-day development needs.
Here’s how that workflow looks, step-by-step.
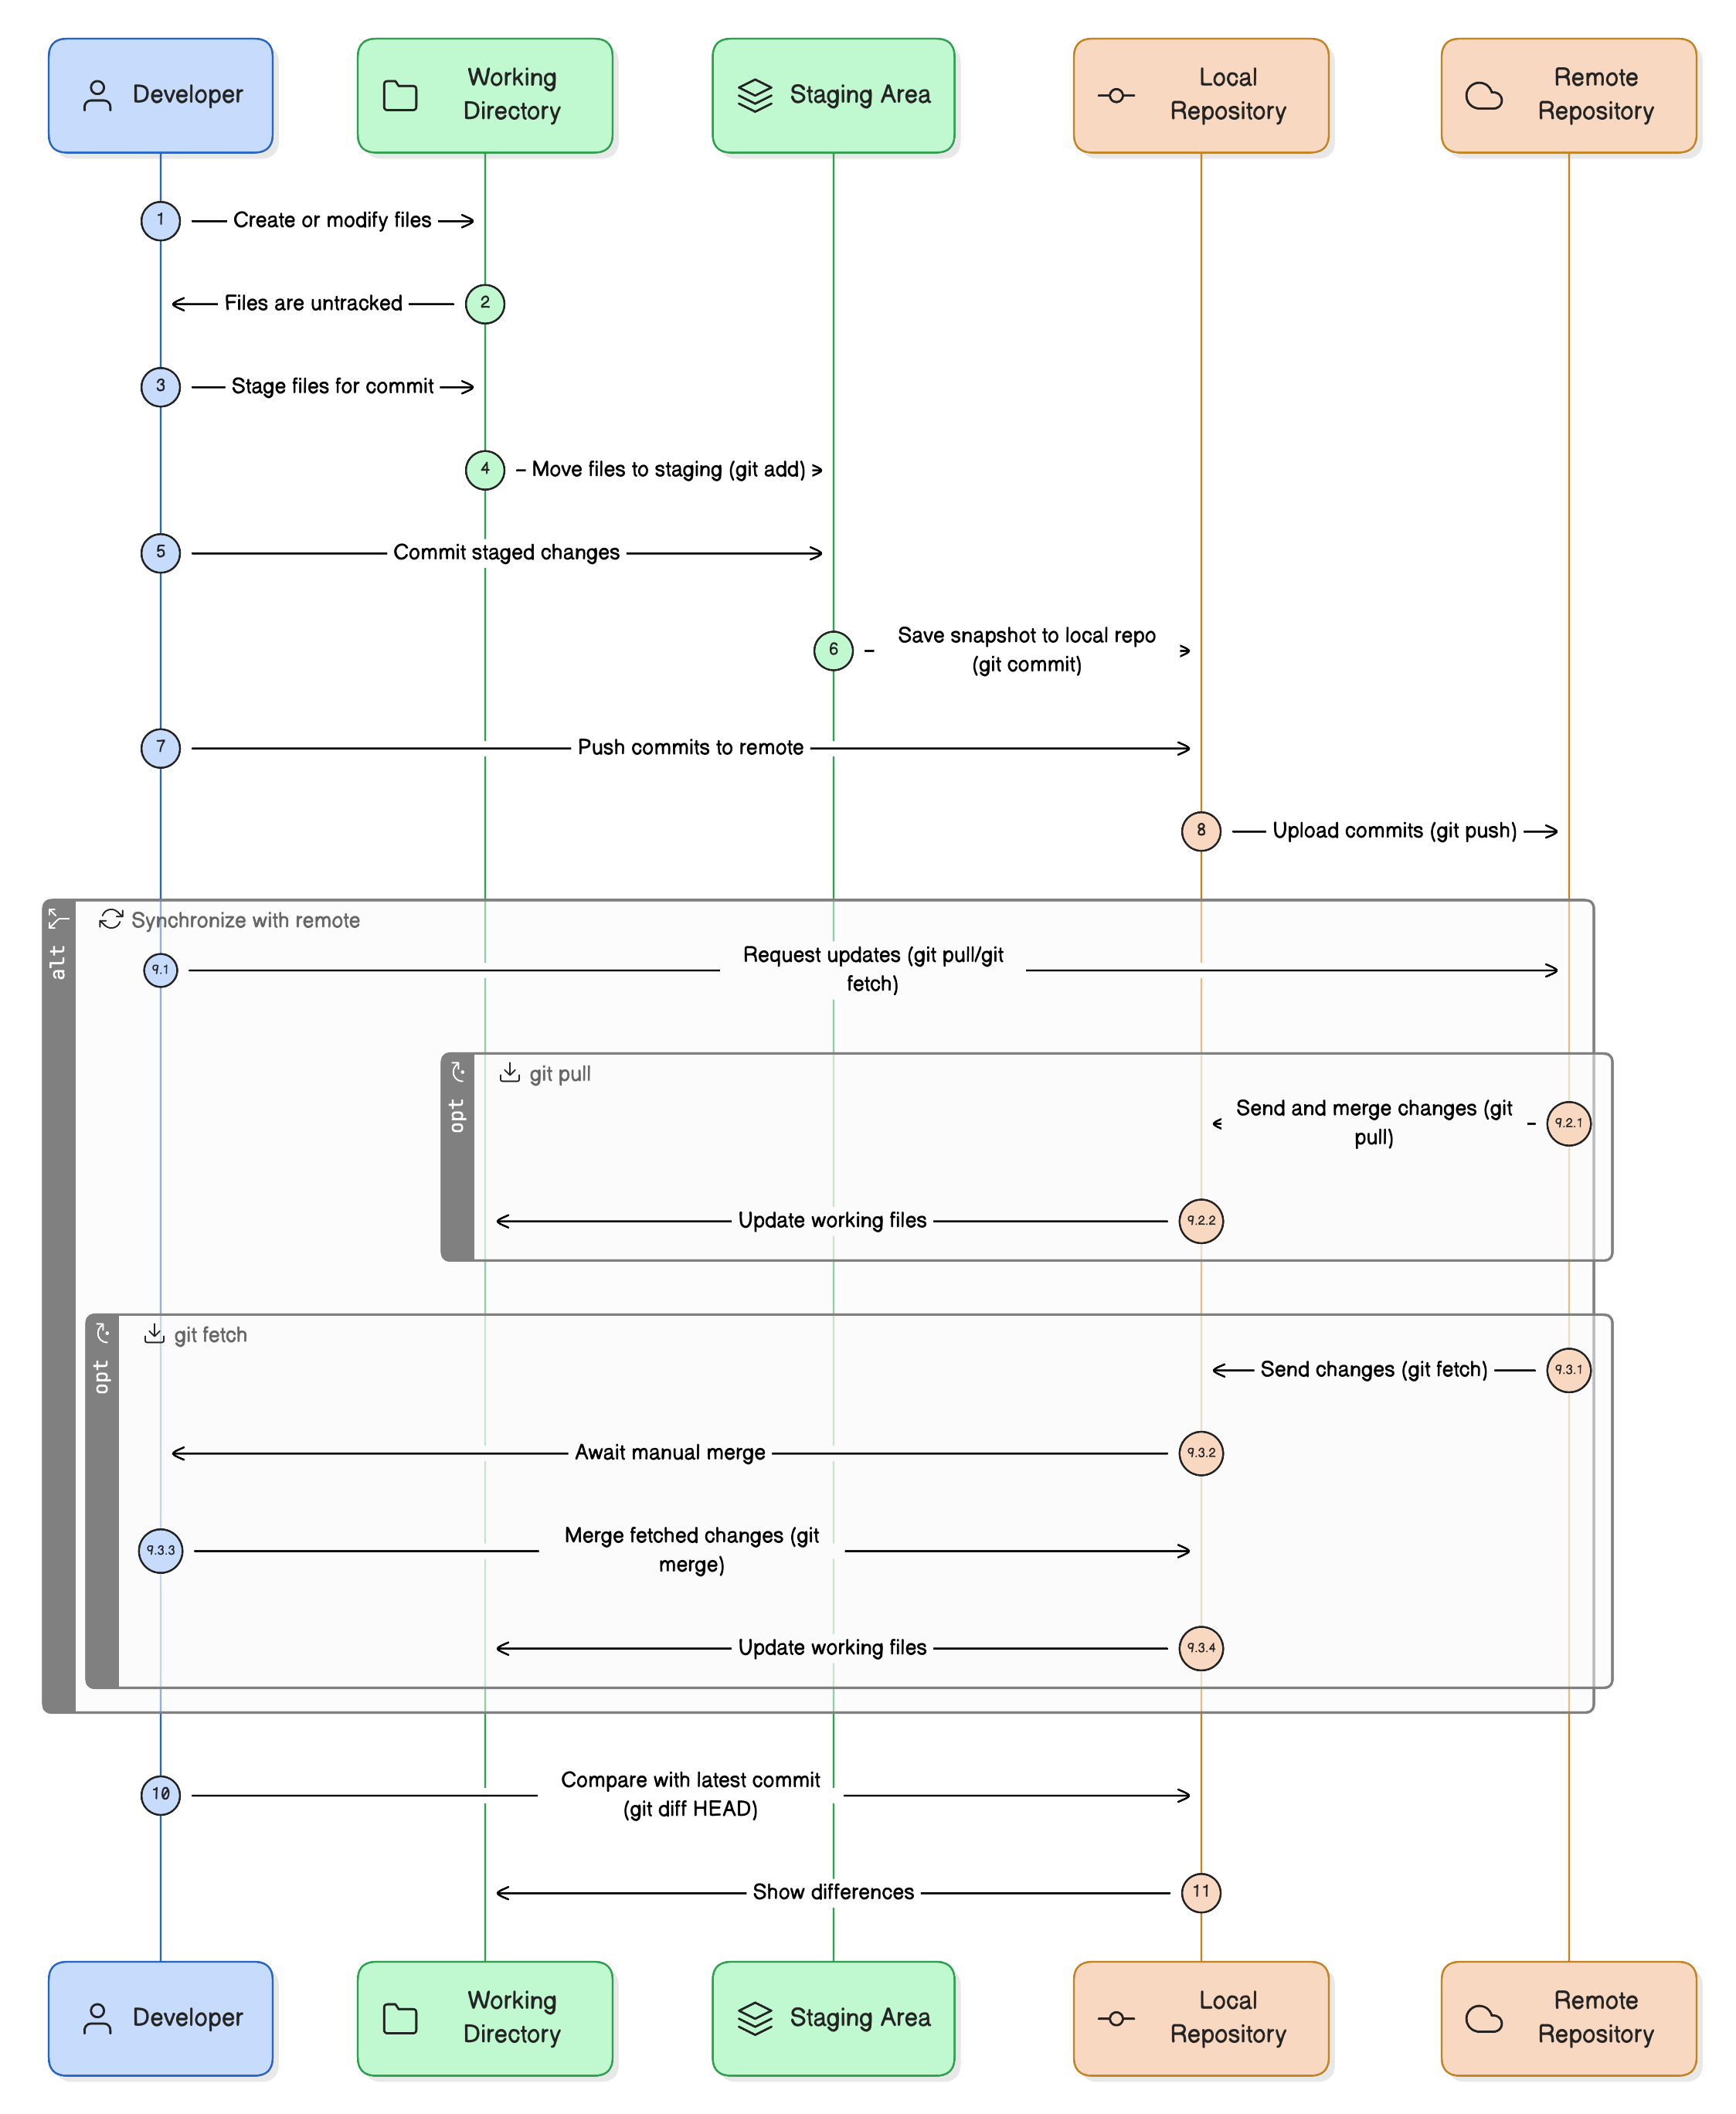
1 - From Working Directory to Staging Area
When you start coding, you’re working in your working directory—this is just your local folder where your project files live. Any new file you create here is untracked by Git, meaning Git doesn’t know it exists yet.
Before Git can save a file into its history, you need to move it into the staging area (also called the index). The staging area is like a waiting room where files sit before you officially record them in your project history.
You do this with the command:
git add filenameOr to add everything at once:
git add .Think of git add as saying:
"I’m ready for Git to remember these changes."
2. From Staging Area to Local Repository (HEAD)
Once your files are staged, the next step is to commit them to your local repository. This is where Git records a snapshot of your code at a particular point in time.
You do this with:
git commit -m "Describe your changes here"The -m flag lets you attach a commit message—basically a short note explaining what you changed. Good commit messages make it much easier to understand the history of your project later.
The term HEAD simply refers to the latest commit you’re on. After you commit, your changes are now officially part of your local Git history.
3 - From Local Repository to Remote Repository
Having commits in your local repository is great, but in most projects, you’ll want to share your work with others (or at least back it up somewhere safe). That’s where the remote repository comes in.
The remote repository is usually hosted on a service like GitHub, GitLab, or Bitbucket. To send your changes from your local repository to the remote, you use:
git pushThis uploads your commits to the shared repository, making them visible to your collaborators (or future you, if you’re working solo).
4 - From Remote Repository to Local Repository
Collaboration works both ways—sometimes, changes are made by someone else and pushed to the remote repository. To get those changes into your local environment, you use either git pull or git fetch.
git pull: Downloads the changes from the remote and merges them into your local code immediately.git fetch: Downloads the changes but doesn’t merge them yet—you can review them first and then usegit mergewhen you’re ready.
Example:
git pull origin mainbrings changes from the main branch of the remote repository directly into your local branch.
If you want more control:
git fetch origin main git merge origin/mainThis first fetches, then merges.
5 - Checking the Differences
Before committing—or sometimes after pulling—you might want to see what’s changed. This helps avoid committing accidental changes or overwriting someone else’s work.
Use:
git diff HEADThis shows the difference between your current working directory and your last commit.
Other useful variations:
git diff— See unstaged changes (what’s changed but not added yet).git diff --staged— See staged changes (what’s ready to commit).
Why This Workflow Works
This simple sequence covers the basics:
Work on your files locally.
Stage the ones you want Git to remember.
Commit them to your local history.
Push to share with others or store remotely.
Pull or fetch to get updates from others.
Check differences to stay on top of changes.
It keeps your workflow organized and prevents chaos in team projects.
Final Tips for Using Git Smoothly
Commit often, commit small — Frequent, focused commits make it easier to track down bugs later.
Write clear commit messages — A commit message should answer what and sometimes why.
Pull before you push — This ensures you have the latest changes before adding your own.
Don’t commit secrets — Keep passwords, API keys, and sensitive files out of Git.
So, do you use a different Git workflow?
Shoutout
Here are some interesting articles that I read this week:
How to Become a Confident Software Engineer by
How DropBox Built Multimedia Search by
Every repeated LLM call is money on fire by
That’s it for today!
Enjoyed this issue of the newsletter?
Share with your friends and colleagues.
Love this
Solid breakdown of the essentials. I like how this workflow focuses on what actually covers 90% of daily development without overcomplicating Git.
For me, the biggest mindset shift was realizing Git is just a history tracker; you decide what goes into that history through staging and committing.
One habit I’d add is regularly using git status before any push or pull to avoid nasty surprises, especially in team projects. Thank you for sharing!!!